
There are many components that go into 3D animation. There’s modeling, rigging, creating materials, texturing, lighting, movement, composition, compositing, and rendering - usually followed in this order. All these processes are essential to creating a finished animated scene.
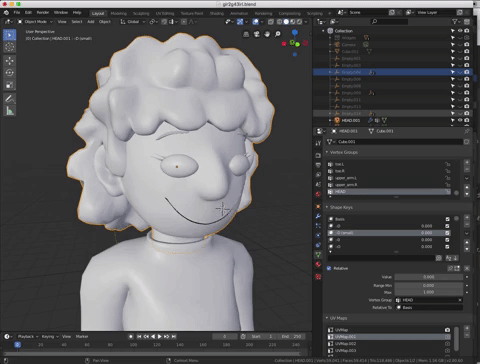
I started animating this film by first modeling all of the characters, props, and scenes I was going to include. Modeling is the process of manipulating a basic shape, such as a cube or sphere, by adjusting its vertices and faces to create, or "model", whatever one desires. Blender has very efficient modeling tools, such as a “sculpt” and “edit” mode, that makes modeling a very easy and fun process. You can also apply modifiers to a mesh, which can manipulate these vertices in algorithmic ways. I first started with modeling my main characters, the daughter and father. I actually made two models of the girl, for the first model’s mesh was unorganized, too high in vertex count (which can lead to too much memory usage), and a little too cartoony. I knew that if I had to use the same model throughout my whole movie, a model I’d be using for months to follow, it had to really meet my expectations. So, I redid the model and made sure it had a low vertex count with less cartoonish features. One way I fixed the high amount of vertices was merging the edge vertices of the mesh to the edges of the clothes, so that there wasn’t an additional layer of vertices for clothes - but rather they are all linked to the same mesh. After I finished the final model of the girl, I made the father. It was a similar process of trying to conserve the number of vertices used, but instead going off a smaller more bulky character design. This was a fun model to make, because of the interesting shape of the character along with his strange line-like eyes. After modeling each character to perfection, along with applying modifiers to smooth the design and solidify the shape, I began to create what is called a “shape keys” for the two characters.
Shape keys are modifiers to the mesh that allow you to make manipulations to an object's vertices, and control the amount of manipulation applied in a custom interval. They essentially allow you to create changes to an object’s mesh and control however much change you prefer. In this case, I used the shape keys to create the character’s expressions. Because I tell this story visually with no dialogue, I had to make sure the shape keys were efficient in that they delivered emotion with lots of variety. To do so, I made a lot of unique shape keys, with variations in different emotions. I made different shape keys for emotions shown from the eyes, mouth, eyebrows, and even nose. I made sure I could control things such as the eye closing, for actions such as blinking or glaring, how much the mouth opens, for exaggeration in emotion or speech, and eyebrow rotation/height, to also convey more emotion and attitude. I also made shape keys to prepare for hair bouncing with the character's movement. However, the most interesting shape key I created was the key to manipulate the rotations of the eyes on the Z axis. This meant I could control how much an eye would leave the head and rotate off of the face. The reason I did so was because of my art style in 2D. In this style, when I have characters at a profile or semi-profile angle, I draw the eye behind the face, sort of floating, facing the viewer. So, to keep this stylistic choice in my art alive in my 3D film, I gave these characters a shape key so that I could rotate their eye towards wherever the camera is. I was very excited to use this shape key through my movie, to keep my style of drawing characters alive in 3D. To make the side characters, the friends of the girl, I duplicated her model and edited their features. I changed their hair, eyes, head shape, height, and clothing to give them each a distinct appearance but a similar build. After finishing all of the models along with their shape keys, it was time to begin rigging each character.
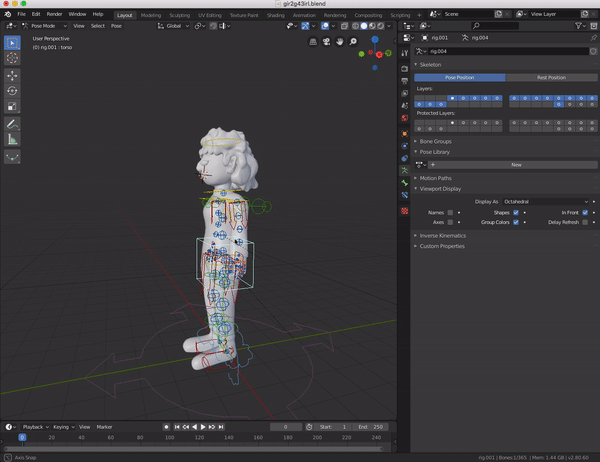
Rigging is probably my least favorite part of animation, however, it is beyond essential. Rigging is the process of creating an armature with bones, connected to a mesh to allow certain vertices to transform in location, rotation, or scale. It is essentially the skeleton of my models and gives them the power to move certain limbs. However, it is not as easy as just drawing on a skeleton. For rigging characters, an armature must first be modeled with each joint aligning with the characters own joints. When the joints are in their perfect positions, their variables must be modified. These variables include the angle in which the bone will roll/rotate, its rotation/location constraints, and its joint positions. After completing this portion, I used an add-on for Blender called “Rigify”, which generates a much more efficient character rig with all of the information put into the initial armature. This new rig allows the legs to bend as the body is moved down, and allows the hand and feet to be manipulated with the arm/leg bones - to follow appropriately as a human would. However, I had a few problems with rigging, mainly due to bugs in the beta version of the program, but also my small knowledge of the Rigify add on. In Blender, to control what vertices move with certain bones and how much they do so, you use the “weight paint” tool. This allows one to, with unique layers of each bone, paint over the mesh to assign vertices to bones. I had trouble using this tool and assigning some vertices to their respective bones, but I used the “edit mode” option to manually select these vertices and assign them to their appropriate bones. It doesn’t sound difficult, but it took a long time as each character had their own difficulties with this process. After finishing the annoying and boring process of rigging, I began to create each character’s material and textures.
Creating the materials and textures for each character was a much more creative process than the process of rigging. Creating a material in animation is manipulating an object's appearance, such as its color, specularity, reflection, roughness, transparency, light emission, sheen, etc. For the skin of my characters, I assigned them a skin tone, little specular and reflection, and high roughness. The roughness blurred the size of the reflection and specularity it receives from lights. I also increased the amount of “subsurface scattering,” which is essentially the amount of light which passes through the material. This is an attribute of skin, that we can see exaggerated when someone shines a flashlight through a finger. When the light goes through, the skin turns red, as light is spreading through the flesh. To emulate this, I turned the subsurface scattering amount of the skin to 0.2 out of 1.0, and set the color that passes through the skin to be red. One downside to the Eevee render engine is that it doesn’t emulate this effect perfectly, however, my materials for the skin were not really relying on that effect. I then made materials for the characters clothing, eyes, and hair. The clothes had no reflections, but a tangent effect to always have light coming from behind the cloth. The eyes had high reflection and specularity, with a small amount of subsurface scattering. The hair had small specularity and small subsurface scattering, as did the shoes. After creating these basic materials, I began creating the textures - mainly for the clothing. To create and apply a texture, one must first “unwrap” the mesh. To do so, the edges of the mesh must be marked to make seams. The mesh is then unwrapped as a UV layout, so that the process of texturing can begin. It’s essentially flattening a 3D model in a way in which each face of the mesh is visible, so one is able to paint over the mesh and apply any image/generated texture. I made textures for shirts with a soft fabric texture, and for some, included stripes. For pants, I made a similar fabric texture but included pockets and seams across the edges of the pants. I manipulated the color of each character’s clothing to give them each their own distinct color palette. Each character wore bright colors and mostly Converse-inspired shoes, for this is how I often draw my characters. After modeling, rigging, and adding materials/textures for all of the characters, I was finally ready to begin creating the sets.
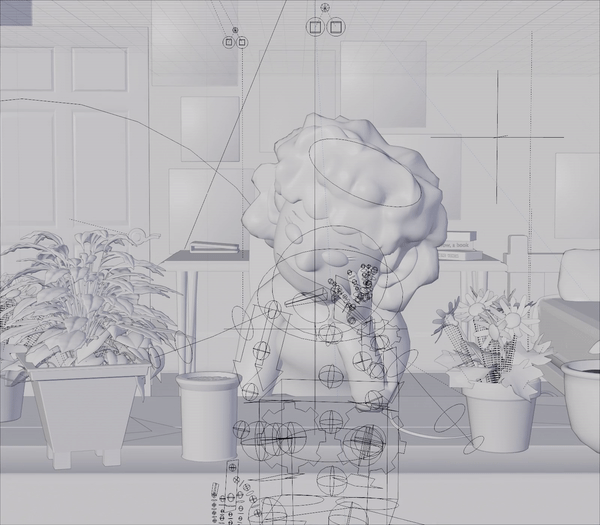
Creating a set is a somewhat similar process to creating characters. However, there is no process of rigging, and rather than creating one single object, a set usually includes many objects of all kinds of shapes, sizes, and materials. It also involves the process of lighting. For this film, I had to create the following scenes: a city, the inside of a bedroom, a living room, a wall of framed pictures, a kitchen, a job interview room, a cubicle, a hospital room, a car on the road, a concert venue, and a graveyard. I also had to create the following props for each scene: for the city, I had to create various buildings, windows, doors, antennas, telephone poles and wires, pipes and rooftop objects, gates, stairs, sidewalks, roads, garbage cans, mountains, trash left on the road, pigeons, and building signs; for the bedroom, I had to create various flowers, vases, walls, doors, a desk, a bed, outlets, papers, books, lamps, chairs, sticky notes, a calendar, posters, album covers, moving boxes, and toys; for the living room, I had to create a TV, a table, a coffee table, remote controls, vases, flowers, books, bowls, napkins, coasters, a couch, doors, walls, a ceiling fan, lamps, moving boxes, framed pictures, and cups; for the wall of framed pictures, I had to create a wall, and framed pictures (not a lot there); for the kitchen, I had to create cabinets, an oven, a microwave, a fridge (inside as well), lamps, food items, a clock, and eating utensils; for the job interview room, I had to create a room, a chair, a boss’s desk, papers, framed pictures, pencils, pens, a clipboard, plants, a lamp, a new suit for the father character, and a boss character who only moves his head; for the cubicle, I had to create an office space, a cubicle area, a spinning chair, many papers, push pins, pens, pencils, erasers, a computer, a hard drive, wires, notebooks, a clipboard, a paper holding rack, a calendar, post-it notes, small cardboard boxes, pencil holders, cups, and outlets; for the hospital room, I had to create a hospital bed, simulated clothes for the bed, lamps, cabinets, a heart monitor, a bench, a chair, a TV monitor, more cloth simulations, doors, plants, and many wires; for the car on the road, I had to create many moving buildings, street lamps, a road, a sidewalk, and a car with an interior (which I actually downloaded from a 3D model sharing website); for the concert venue, I had to create a stage, a large room for a venue, amplifiers, instruments, wires, speakers, microphones, moving crowd members (which I downloaded as well), an antenna tower at the ceiling, stage lights with different colors, monitor speakers, gates, and stairs; and finally, for the graveyard, I had to create a ground of grass and dirt, flowers, stone walls, trees, tree stumps, rocks, stones, framed pictures, and a tombstone. I had to model and texture all of these items, which took a great amount of time. After modeling them all, I arranged them to make each scene - however, I was not at all done yet with building these environments. I then had to create the lighting for each environment, which personally, is a very fun process.
Before beginning the procedure of lighting scenes, I watched a course on lighting fundamentals by a CG artist named Andrew Price. I learned from this video how I should correctly light my scenes, with the essentials of direction, size, readability, color, and emphasis. In Blender, there are different types of lights: a point light, which is almost a sphere of light with a customizable radius, a spot lamp, which is a cone-like type of light, a sun light, which can light a whole scene, a Hemi light, which has no shadow and fills the black within a scene, and an area light, which is a light source in a square/rectangle shape that only emits to one direction. All of the colors can be manipulated on these lights as well as the size of their shadow. I duplicated some scenes to shift tones, times in the day, and color preferences. I made a scene of the bedroom with daytime light, sunset light, and night light, I made the living room scene with TV lights and lamps on, TV lights and no lamps on, and vice versa, and I made the hospital scene with different color palettes to create unique moods and tones. I also took use of “volumetric lighting” in some scenes, which is processes very efficiently in the Eevee engine. Volumetric lighting is light that has weight and volume in a scene, which can create a nice halo effect. In the Cycles engine, this function would multiply the time to render by nearly 10x, but in Eevee, this function is real time and doesn’t take too much data to process. Because of the ease of applying this effect, I definitely took advantage of it as much as I possibly could. Now that all of the characters and scenes were modeled, textured, rigged, and lit, I could now move onto the movement aspect of animation.
However, I couldn’t begin animating movement because the movement of my characters relied on music, which I had to create first. For this animation, I wanted to make music which the character’s actions are in sync to, so every movement is on the beat. And since the story is very dependent on musicians, I had to make sure the music aspect of this film blended efficiently with the animation. For a few weeks at home and in my digital music class, I began making drafts of instrumentals to use. I played with various instruments, tempos, keys, and tones throughout all of the beats I made. Yet I couldn’t seem to make a song that really stuck with me - one that would be perfect to drive the story forward and didn’t feel too tiresome. After all, it would be the beat the viewers would hear for almost 5 entire minutes, and one I’d be hearing on repeat for the 4 months of working on the project. As I was struggling to create the perfect sound, I decided to go back into my older music files for inspiration. That’s when I found the perfect instrumental to use, one that just felt so right with the story and style of the film. It was funky, fast, and very upbeat yet still very smooth; but most importantly, carried a very happy mood that would definitely set a great tone for the beginning of the film. I added some final touches and extra percussion tracks, mixed and mastered it all, and exported it as a final instrumental to use for the animation. After doing so, I decided to make variations of the song to use for different times within the movie, with each beat presenting different moods to accompany the unique moment of the story. I made a few sad covers of the song in a more depressing key, a few darker and edgier versions, and one even more pumping and energetic version. With all of these instrumentals completed, I could really move on to the hardest and longest process of animation: animating.
Though animating is primarily the movement of objects and characters, it’s really changing a variable along a certain amount of time. For example, I can animate a light source by having the color of it shift from red to blue in 3 seconds. Just like any animated film, I knew I had to put months into the animating process. Though it can be extremely frustrating and exhausting, it can be fun in scenes of great movement and action. I had an idea for the last animation of the aliens I was going to make, which was to animate in a step time of 2 frames, meaning character movement only happens every other frame while cameras and all other objects are animated on every frame. This effect can be often found in stop motion and cartoons, however, the reason I decided to approach this effect in my new animation was because of the new Spider-Verse movie. That movie is animated in 3D, but to keep a cartoon and comic-esque feel to the animation, they animate most characters in step time. I definitely wanted to approach this technique, for it’s also how I’ve mainly animated in 2D. To apply this effect, I had to make sure my keyframes had a “constant” movement. In animation, to create movement, one must apply two keyframes, one for a start position and an end position. Most modern programs will fill in the motion between the two keyframes, allowing an object to move to point A and B without just teleporting. Blender allows you to even control the curve of motion; for example, you can have an object move slowly toward point B at the beginning of the action, but toward the end of moving towards point B it will move exponentially faster. However, I didn’t want any type of curve applied, as I wanted to have my motion “constant”, meaning the character animation will have no motion in between keyframes - just as claymation does. I wanted to manually animate each frame, but only on every other frame to give the movement step time.
I then began to animate. The first two scenes were very easy, for they were simple linear camera movements. The first was just the camera panning from left to right of a wall with framed pictures, and the next was the camera moving and zooming towards the buildings. The next scene was the first scene with character animation, and t was very fun to begin animating my characters to the beat of my music. Each movement they have must follow a hit in the song, which made the process very creative, as it also was for using the tons of shape keys I made for the character’s mouths, eyes, and eyebrows. Animating a character’s blink really made them feel alive, which I wasn’t expecting at all. I took about 3 months to complete all of the character animation, which I didn't have many problems doing other than the immense time it took to do so. One problem, however, was that so many scenes had such a high vertex count that my computer couldn’t process playing back what I had animated. Playing back a scene would be laggy and inaccurate, so I had no way to see my animations finished in the viewport. To resolve this issue, I exported a “viewport render”, which is a function in Blender that allows the user to process a full render with the viewport. This allowed me to playback my animations as a rough render, and see what I had to change in the character’s movement. However, characters weren’t the only thing I had to animate. I had to animate props as well, such as rotating ceiling fans and cloth simulations - like blankets on characters. I also had to animate cameras, adjusting their position, rotation and focal length. I also had to animate the depth of field, which was fun to program. I assigned the focus point of the DOF to an “empty”, which was a point I could move around in the viewport. This allowed the camera to shift focus on different objects. The last thing I had to animate were the compositing nodes to shift color correction and effects. After finalizing all of the animation, I made sure each frame of the movie looked clean and readable with the characters. To do this without rendering the entire movie, I rendered multiple individual frames throughout all of the scenes, to make sure the size of the characters and their color worked with the scenes. After making small adjustments to these qualities, as well as making sure characters were correctly lit, and their textures worked appropriately with the scene, I moved onto adding smaller effects in each scene.
I added ambient occlusion to each scene, which is an effect that adds a soft shade to the edges of two colliding objects. The effect can be great for making two objects not look as if they are intersecting each other. The radius, amount, and accuracy variables of this effect can all be manipulated through the Eevee engine. I also added a bloom effect, which in Eevee, adds a glowing flare effect to bright points in a scene. The variables that can be manipulated with this effect are the threshold, the radius, the color, and the intensity. The final effect I added to each scene was a motion blur effect, however, in the Eevee engine, motion blur would only be applied to the movement of the camera. However, since my characters were animated in step time, I didn’t really need this effect applied to them. After finishing adding these small effects to these scenes, I moved on to composition, which is adjusting the final effects and color of the scenes. In Blender, to apply these adjustments, one must use the “node editor”, which allows you to connect nodes of effects for your final frames. I didn’t add many color adjustments to my scenes, for I wanted to adjust these in my video editor. However, I did add a “lens distortion” effect to each scene, which gives the outer edges of the scene a nice prism effect, which I can’t emulate in Final Cut Pro X. I also added a nice “glare” filter, which exaggerates the bloom effect and can add lens flares from lights of strong threshold. After finishing all of the modeling, texturing, lighting and animating of all my 3D scenes, it was time to begin the 2D animation portion of my project.
Though this film is primarily 3D animation, I wanted to include a few scenes with 2D animation. The scenes I kept for a 2D scene were either too hard to emulate in 3D, or were just to exaggerate cartoony scenes within the film. I animated all of the 2D animated scenes in Adobe Animate CC, and kept them in step time. I used my Bamboo Wacom tablet and took advantage of the pen pressure you can apply to thicken or thin lines wherever you desire. This adds a nice realistic brush effect to whatever it is you are drawing. My characters also all moved to the beat of the music, which was just as fun to emulate in the world of 2D animation. With all of the animating work done within my film, it was time to move on to the final steps of creating the film: the rendering and editing process.
PART 2: ANIMATION / MUSIC


Blender 3D Viewport
Initial Model
Final Model